
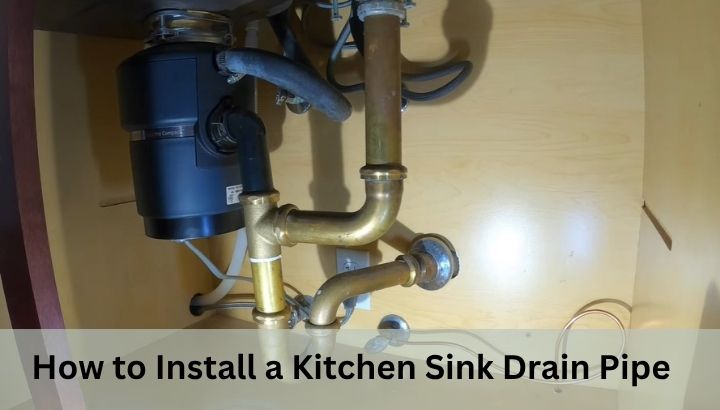
To install a kitchen sink drain pipe, connect the drain basket to the sink opening with plumber’s putty and a locknut, attach a tailpiece to the basket, connect a P-trap assembly to the tailpiece, run a horizontal drain arm to the wall stub-out, and secure all slip-joint fittings hand-tight before final snugging with pliers, then test for leaks by running water.
Installing a kitchen sink drain pipe is one of the most practical and cost-saving plumbing tasks a homeowner can complete independently. Whether you are setting up a brand-new sink, replacing a corroded drain assembly, or reconfiguring plumbing after a kitchen renovation, the drain pipe installation process follows a logical sequence that does not require soldering, cutting copper pipe, or any licensed plumbing work in most residential jurisdictions. This guide covers every component, every step, and every real-world complication you are likely to encounter, including double-bowl sink configurations, garbage disposal hookups, and dishwasher drain connections.
What Is a Kitchen Sink Drain Pipe System
A kitchen sink drain pipe system is the network of components that carries wastewater from the sink basin through the cabinet space and into the household drain-waste-vent (DWV) system inside the wall or floor. Understanding the full system before touching any tools prevents the most common installation errors, which are almost always the result of missing a component or misunderstanding how the pieces connect in sequence.
The Function of Each Component
The drain basket, also called the sink strainer or drain flange, sits in the opening at the bottom of the sink bowl and serves as the transition point between the sink basin and the drain pipe below. It consists of a strainer body that protrudes through the sink hole, a rubber or silicone gasket that seals the joint beneath the sink, a friction ring, and a locknut that threads onto the drain basket body from below to clamp the entire assembly to the sink. Brands like Dearborn Brass, Kohler, Moen, Keeney, and Westbrass manufacture drain baskets in stainless steel, brushed nickel, oil-rubbed bronze, and matte black finishes to match faucet hardware.
The tailpiece is a straight vertical pipe section that connects to the threaded outlet at the bottom of the drain basket. Standard kitchen sink tailpieces are 1.5 inches in diameter and come in lengths ranging from 6 to 12 inches. The tailpiece carries water straight down from the drain basket to the P-trap inlet.
The P-trap is the curved pipe section shaped like the letter P or U when viewed from the side. It retains a small standing reservoir of water that physically blocks sewer gases from traveling back up through the drain pipe and into the kitchen. This water seal is the reason you should never remove the P-trap permanently or leave the drain system open. The P-trap assembly consists of a curved trap arm (the U-bend) and a straight trap arm extension that connects to the drain stub-out in the wall. P-traps are available in plastic (PVC and ABS) and metal (chrome-plated brass) versions.
The drain arm, also called the trap arm or wall bend extension, is the horizontal pipe that runs from the P-trap outlet to the drain stub-out inside the wall. This piece must be installed with a slight downward slope toward the wall, typically a minimum of one-quarter inch of drop per foot of horizontal run, to ensure wastewater flows toward the DWV system by gravity rather than pooling in the horizontal section.
The wall stub-out is the fixed drain pipe protruding from the wall inside the sink cabinet. It connects to the household DWV system and accepts the trap arm. Stub-outs are typically 1.5 inches in diameter in residential kitchens and may be PVC, ABS, or older galvanized steel.
Pipe Materials Used in Kitchen Sink Drain Systems
PVC (polyvinyl chloride) in white is the most common material for new residential kitchen drain installations. It is lightweight, inexpensive, easy to cut, compatible with both solvent-weld and slip-joint connections, and resistant to most household chemicals. Standard DWV PVC pipe for kitchen drain applications uses Schedule 40 wall thickness.
ABS (acrylonitrile butadiene styrene) in black is the alternative plastic used in drain systems, particularly in homes built before 1990 on the West Coast of North America. ABS uses its own specific solvent cement and should not be solvent-welded to PVC without a transition cement specifically formulated for cross-material bonding.
Chrome-plated brass drain components offer a finished appearance visible through open cabinet doors and are more resistant to physical damage than plastic. They are heavier, more expensive, and require more careful wrench use to avoid scratching the chrome finish, but they carry a longer service life and suit higher-end kitchen installations.
PP (polypropylene) in gray or white is increasingly used for drain fittings, particularly in European-style drain kits, and offers good chemical resistance and a cleaner appearance than standard white PVC.
Tools and Materials Required for Installation
Assembling all tools and components before beginning the installation prevents the frustration of discovering a missing part midway through the job with the water shut off and the old drain disconnected.
Tools You Will Need
A pair of channel-lock pliers (also called tongue-and-groove pliers or Channellock brand pliers) is the primary tool for tightening slip-joint drain fittings. A pipe wrench or adjustable wrench handles any metal threaded connections at the drain basket locknut. A hacksaw or PVC pipe cutter trims tailpieces, drain arms, and extensions to the correct length. A tape measure and pencil mark pipe cutting lengths before cutting. A basin wrench or large pliers handles the drain basket locknut from below the sink if access is tight. Plumber’s putty or silicone sealant seals the drain basket flange to the sink surface. Teflon thread tape (PTFE tape) is used on any threaded metal-to-metal connections in the system. A utility knife deburrs cut pipe ends. A level confirms the correct horizontal slope in the drain arm.
Complete Parts List for a Single-Bowl Sink
For a straightforward single-bowl kitchen sink drain installation, you will need one drain basket assembly with gasket and locknut, one tailpiece (1.5 inch by 6 or 8 inches), one P-trap kit (which typically includes the trap bend, trap arm, and slip-joint nuts and washers), one drain arm extension if the distance from the trap to the wall stub-out requires it, and a tube of plumber’s putty or silicone sealant for the basket seal. The total parts cost for a standard plastic installation ranges from $15 to $45 depending on material choice. Metal chrome assemblies from brands like Dearborn, BrassCraft, or Delta cost $40 to $90 for a complete kit.
Parts Required for a Double-Bowl Sink
A double-bowl kitchen sink requires two drain basket assemblies, two tailpieces, a continuous waste fitting (also called a center outlet or end outlet fitting), which joins both tailpieces into a single outlet pipe, a single P-trap assembly below the continuous waste fitting, and a drain arm running to the wall. The continuous waste fitting is the key differentiating component of a double-bowl setup and comes in two configurations: center outlet (the outlet exits from the center pipe connecting both tailpieces) and end outlet (the outlet exits at one end, usually under the smaller bowl). Keeney Manufacturing and Dearborn Brass both produce well-regarded double-bowl drain kits.
Step-by-Step Guide to Installing a Kitchen Sink Drain Pipe
The installation process is divided into two main phases: installing the drain basket into the sink, and assembling the drain pipe components underneath the sink. Both phases are described in full below.
Phase 1: Installing the Drain Basket
Begin with the sink either already mounted in the countertop or positioned on a stable work surface if installing before mounting. Clean the area around the sink drain opening with a dry cloth to remove any debris or old putty residue from a previous installation.
Roll a rope of plumber’s putty approximately 3/8 inch in diameter between your palms. Press this rope around the underside perimeter of the drain basket flange, the flat rim that will sit visible on the top surface of the sink. The putty creates a waterproof seal between the stainless steel or porcelain sink surface and the metal drain flange. If your drain basket manufacturer specifies silicone sealant instead of putty (common with stainless steel and composite sinks), apply a thin bead of 100% silicone caulk around the flange perimeter instead. Some manufacturers, particularly those making undermount sinks, include a rubber gasket with the drain basket that eliminates the need for putty or sealant entirely.
Press the drain basket firmly down into the drain opening from above. From below the sink, slide the rubber gasket, then the friction ring, and then the cardboard washer (if included) up onto the threaded drain basket body in that order. Thread the locknut onto the drain basket body by hand until it contacts the friction ring. Using channel-lock pliers or a drain wrench, tighten the locknut in a clockwise direction while holding the drain basket stationary from above using the handles of a large pair of pliers inserted into the drain basket crossbars. Tighten until the basket is firmly clamped to the sink and the putty squeezes out slightly around the flange on the top side. Wipe away any excess putty with a damp cloth.
Phase 2: Assembling the Drain Pipe Components
With the drain basket secured, move to the under-sink work area. The assembly sequence always runs from top to bottom and from the sink outward toward the wall.
Thread the tailpiece onto the drain basket outlet. Most drain baskets use a slip-joint connection at the outlet, meaning the tailpiece slides into the basket outlet and is secured with a slip nut and neoprene washer rather than a threaded connection. Slide the slip nut onto the tailpiece first (threads pointing up), then the neoprene washer (beveled edge pointing up), then insert the tailpiece into the drain basket outlet. Hand-tighten the slip nut upward onto the drain basket outlet threads. If your tailpiece is too long for the distance between the basket and the P-trap inlet, mark the cutting point with a pencil and cut with a hacksaw or PVC pipe cutter, deburring the cut end with a utility knife before assembly.
Position the P-trap assembly below the tailpiece outlet. The P-trap consists of two pieces: the curved trap bend (the U-shaped section) and the trap arm (the short straight section that angles toward the wall). Slide the slip nut and washer onto the trap arm before inserting it into the wall stub-out, because it is nearly impossible to install the nut after the arm is in position. Insert the trap arm into the wall stub-out to the appropriate depth (typically 1.5 to 2 inches of insertion for a secure slip-joint connection). Connect the curved trap bend to the tailpiece outlet using its own slip nut and washer, then connect the other end of the trap bend to the trap arm. At this stage, leave all connections hand-tight only. This allows you to adjust angles and alignment before making everything final.
Check the horizontal alignment of the trap arm. Using a level, confirm that the trap arm runs at a slight downward angle toward the wall stub-out rather than being perfectly level or angled upward. An upward-angled trap arm prevents the P-trap from maintaining its water seal and can cause slow draining. A perfectly level trap arm allows debris to accumulate over the length of the run rather than flowing by gravity toward the stack.
Once all components are positioned correctly and all joints are aligned without stress or kinking, go through every slip-joint connection and tighten it a full quarter to half turn past hand-tight with channel-lock pliers. Apply only moderate force on plastic fittings because over-tightening PVC and ABS slip nuts cracks the nut or deforms the washer, creating a leak rather than preventing one. Metal chrome connections require slightly more torque but should similarly not be over-tightened to the point of warping the slip nut.
Installing a Double-Bowl Continuous Waste System
For a double-bowl sink, install both drain baskets as described above. Attach a tailpiece to each basket. The continuous waste fitting connects the two tailpieces with a horizontal cross-pipe and provides a single vertical outlet below the centerline or end of the assembly. Measure the distance between the two drain basket outlets and cut the horizontal section of the continuous waste fitting to the correct length. Most kits include adjustable sections for this purpose. Attach the continuous waste fitting to both tailpieces using slip nuts and washers, ensuring the cross-pipe is level between the two bowls. Below the outlet of the continuous waste fitting, attach the P-trap assembly and drain arm as described for a single-bowl configuration.
Connecting a Garbage Disposal to the Drain System
If one bowl of the sink has a garbage disposal installed, the disposal replaces the drain basket and tailpiece on that side. The disposal unit has its own outlet port, called the discharge port, located on the side of the lower housing. A discharge tube connects this port to the continuous waste fitting on the standard drain side, or directly to the P-trap if the disposal is the only drain. Mount the disposal unit according to the manufacturer’s instructions (common brands include InSinkErator, Waste King, Moen, and KitchenAid), then connect the discharge tube from the disposal outlet to the inlet of the P-trap or the continuous waste fitting using a slip-joint connection and rubber gasket. If a dishwasher is also connected to the sink, its drain hose connects to the disposal’s dishwasher inlet port (a nipple on the upper side of the disposal housing) after removing the factory knockout plug inside the port using a hammer and screwdriver.
Types of Kitchen Sink Drain Pipe Configurations
The physical layout of the drain assembly varies depending on the sink type, cabinet dimensions, and wall stub-out position. Understanding the configuration options helps select the right components before purchasing.
Standard Single-Bowl Configuration
One drain basket, one tailpiece, one P-trap, one drain arm to the wall. This is the simplest and most common residential setup. The P-trap connects directly below the tailpiece, and the horizontal arm runs straight back to the wall stub-out. Suitable for single-basin sinks, bar sinks, and utility sinks.
Double-Bowl Center Outlet Configuration
Both bowls drain into a continuous waste fitting with a center outlet positioned between the two basins. The P-trap connects below the center outlet. This configuration keeps the P-trap centered under the cabinet, which is useful when the wall stub-out is centrally located.
Double-Bowl End Outlet Configuration
Both bowls drain into a continuous waste fitting with the outlet at one end (usually the smaller bowl side). The P-trap is positioned at one end of the cabinet. This is preferred when the wall stub-out is positioned at one side rather than centered, reducing the length of horizontal drain arm needed.
High-Loop Dishwasher Drain Configuration
When a dishwasher drain hose connects to the sink drain system, the hose must be routed upward to the highest point accessible under the counter (creating a high loop) before descending to the connection point at the disposal or drain inlet. This high loop prevents backflow of drain water into the dishwasher. In some municipalities, a separate air gap fitting mounted on the countertop or sink deck is required instead of a high loop as a more reliable backflow prevention measure.
Comparison Table: Drain Pipe Material Options
| Material | Color | Weight | Cost | Durability | Best Application | Chemical Resistance |
|---|---|---|---|---|---|---|
| PVC Schedule 40 | White | Light | Low ($) | High | New residential installs | Excellent |
| ABS | Black | Light | Low ($) | High | Older homes, West Coast | Very Good |
| Chrome-plated brass | Chrome | Heavy | High ($$$) | Very High | Visible exposed runs | Good |
| Polypropylene (PP) | Gray/White | Light | Medium ($$) | High | European-style kits | Excellent |
| Galvanized steel | Gray | Very Heavy | Medium ($$) | Low (corrodes) | Legacy/replacement only | Poor |
| PVC with ABS transition | Mixed | Light | Low-Medium | High | Mixed-material DWV systems | Excellent |
Common Mistakes to Avoid When Installing a Kitchen Sink Drain Pipe
The most frequent installation problems are not caused by complicated technical failures but by a small set of predictable errors that are easy to avoid once you know what to watch for.
Mistakes That Cause Leaks and Drainage Problems
Installing the neoprene washer in the wrong orientation is one of the most common causes of slip-joint leaks. The bevel (tapered edge) of the washer must always face toward the fitting it is sealing against, not away from it. When the bevel faces inward toward the connection, tightening the slip nut compresses the washer into a cone shape that fills the gap between the pipe and fitting walls. When installed backwards, the washer is pushed out of position when tightened rather than compressed into the seal.
Forgetting to slide the slip nut and washer onto the pipe before inserting it into the fitting is a mistake that requires full disassembly to correct. Once the pipe end is inside the fitting, there is no way to add the slip nut. Always thread the nut and washer onto the pipe end before making any connection.
Installing the P-trap without a water seal by tilting or orientating the trap incorrectly means that sewer gases are not blocked. The U-bend of the P-trap must always retain standing water at its lowest point. If the trap is installed upside down or at an angle that allows all water to drain out, the seal is lost and sewer odors enter the kitchen.
Using the wrong pipe diameter causes connection problems that are immediately obvious but time-consuming to fix with a trip back to the hardware store. Standard kitchen sink drain pipe diameter is 1.5 inches for the trap assembly and all connections from the basket to the wall. Bathroom sink traps are typically 1.25 inches, and the two sizes are not interchangeable. Confirm the diameter of the wall stub-out and the drain basket outlet before purchasing components.
Applying plumber’s putty to sinks or drain baskets that specify silicone sealant causes compatibility problems. Plumber’s putty contains oils that stain porous surfaces like natural stone, cultured marble, and some composite sink materials. Always check the sink manufacturer’s instructions before using putty. When in doubt, use clear 100% silicone sealant, which is compatible with all sink materials.
Over-tightening plastic slip-joint nuts is the leading cause of post-installation leaks that appear one to two days after installation when slight thermal expansion and contraction shifts the fittings. Plastic nuts tighten to a mechanical stop point relatively quickly, and applying additional force past this point cracks the nut at its base where the threads begin, creating a hairline fracture that drips slowly. Hand-tight plus a firm quarter turn is sufficient for all plastic slip-joint connections.
Ignoring the slope of the horizontal drain arm causes chronic slow draining that worsens over time. A level drain arm allows food particles and grease to accumulate along its entire length rather than flowing toward the stack. Measure and confirm the drop before tightening the trap arm connection at the wall stub-out.
Frequently Asked Questions (FAQs)
What size pipe is used for a kitchen sink drain pipe installation?
The standard pipe diameter for a kitchen sink drain pipe installation is 1.5 inches for all components from the drain basket outlet through the P-trap and drain arm to the wall stub-out. This 1.5-inch nominal diameter is specific to kitchen sinks and is different from bathroom sink drain assemblies, which typically use 1.25-inch components. The wall stub-out inside most residential kitchen cabinets is also 1.5 inches in diameter. Confirming this measurement before purchasing components prevents the most common parts-mismatch error in drain installations.
How deep should the P-trap be set when installing a kitchen sink drain pipe?
When installing a kitchen sink drain pipe, the center of the P-trap inlet should ideally be positioned no more than 24 inches below the drain basket outlet, as specified by the International Residential Code (IRC) and most state plumbing codes. Exceeding this distance between the drain basket and the trap creates a condition known as a dry trap, where the velocity of falling water through an excessively long tailpiece can siphon the water seal out of the P-trap, allowing sewer gases to pass through. The typical distance in a residential kitchen is 8 to 14 inches of tailpiece, which keeps the trap within the correct range for virtually all standard cabinet depths.
Can I install a kitchen sink drain pipe without plumber’s putty?
Yes, a kitchen sink drain pipe can be installed without plumber’s putty by using 100% silicone sealant as a direct substitute. In fact, silicone is the required sealant for stone sinks (granite, marble, soapstone) and many composite sinks because plumber’s putty contains petroleum-based oils that stain porous materials permanently. Some drain basket kits include a rubber or silicone gasket specifically designed to eliminate the need for either putty or sealant, relying entirely on mechanical compression from the locknut to create the watertight seal at the drain opening. Always follow the drain basket manufacturer’s guidance on which sealing method is appropriate for the specific product and sink material.
How do I connect a dishwasher drain to a kitchen sink drain pipe?
To connect a dishwasher drain to a kitchen sink drain pipe system, route the dishwasher’s flexible drain hose to either the inlet port on the garbage disposal housing (if a disposal is installed) or to a dishwasher branch tailpiece fitting on the drain system (if no disposal is present). If connecting to a disposal, remove the knockout plug from the dishwasher inlet port using a hammer and screwdriver before attaching the hose. Secure the hose with a hose clamp. In both cases, create a high loop in the dishwasher drain hose at the highest accessible point under the counter before it descends to the connection point, which prevents drain water from backflowing into the dishwasher during sink use. Some local plumbing codes require a countertop air gap fitting instead of a high loop for certified backflow prevention.
What is the correct slope for the drain arm in a kitchen sink drain pipe installation?
The minimum required slope for the horizontal drain arm in a kitchen sink drain pipe installation is one-quarter inch of vertical drop for every foot of horizontal pipe run, which corresponds to approximately a 2% gradient. This slope is specifically required by plumbing codes including the International Plumbing Code (IPC) and International Residential Code (IRC) to ensure that wastewater flows by gravity toward the DWV stack rather than pooling. An arm that slopes too steeply (more than half-inch per foot) allows water to drain too quickly, leaving solid debris behind. An arm with no slope or an upward slope creates standing water that promotes buildup, odors, and eventual blockage.
How long does it take to install a kitchen sink drain pipe?
For a first-time installer working carefully and methodically, installing a kitchen sink drain pipe on a single-bowl sink typically takes between 45 minutes and 2 hours from start to finished leak test. A double-bowl installation with a continuous waste fitting adds 20 to 45 minutes to the process. The most time-consuming steps are usually the drain basket installation (due to working upside-down under the sink for the locknut) and any tailpiece or drain arm trimming needed to fit the specific cabinet geometry. An experienced DIYer familiar with slip-joint plumbing can typically complete a single-bowl installation in 30 to 45 minutes.
Do I need to use Teflon tape when installing a kitchen sink drain pipe?
Teflon tape (PTFE tape) is not used on the slip-joint connections that make up most of a kitchen sink drain pipe installation because those joints rely on neoprene compression washers rather than threaded seals. PTFE tape is appropriate only for tapered NPT (National Pipe Thread) threaded metal-to-metal connections, such as the threaded connection between a metal P-trap and a metal drain basket outlet in older assemblies, or when connecting to a threaded metal wall stub-out fitting. Using PTFE tape on slip-joint compression nuts adds material bulk that can actually prevent the neoprene washer from seating correctly, which may cause a slow drip rather than preventing one.
What should I do if my kitchen sink drain pipe leaks after installation?
If a kitchen sink drain pipe leaks after installation, begin by identifying the exact leak location with the sink running and a flashlight pointed at each connection point. A leak at a slip-joint connection means that either the slip nut needs an additional quarter turn of tightening, the neoprene washer is installed backwards (bevel facing the wrong direction), or the washer is damaged and needs replacement. A leak at the drain basket flange means the plumber’s putty or silicone seal was insufficient, either because too little was applied or because the drain basket was installed in a sink material that is incompatible with putty. A leak at the wall stub-out means the trap arm is not fully inserted and seated in the stub-out opening. Most post-installation leaks resolve with minor tightening adjustments rather than requiring full disassembly.
Conclusion
Installing a kitchen sink drain pipe is a methodical, tool-accessible process that most homeowners can complete in under two hours without professional plumbing assistance. The sequence runs consistently from the drain basket at the top, through the tailpiece and P-trap assembly, to the drain arm at the wall stub-out.
Using correctly oriented neoprene washers, confirming proper slope in the horizontal drain arm, and performing a thorough leak test before closing up the cabinet are the three habits that separate a successful installation from one that requires a callback.
For single-bowl and double-bowl configurations alike, complete drain kits from brands like Dearborn Brass, Keeney, BrassCraft, and Westbrass include all necessary components and simplify both the purchasing and installation process significantly.